The start of many thing's to come...

Basically decided to create this blog to keep a record of all my University work neatly and tidily in one place! Currently studying at Staffordshire University (Stafford Campus) doing a Computer Games Design Degree! So this blog will mainly consist of many 3D artwork and maybe some of my programming work from previous years.

Feel free to comment or suggest anything and be honest. Bad feedback is better than no feedback!

Thursday 28 October 2010

Unreal Tournament3 CTF Map Prep

OK so my task for my Games Engine design course is to create a UT3 CTF (Capture the flag) map.  The first process involved is to create a Development diary showing basic ideas, notes, sketches etc..  The Dev Diary does not need to be neat just something I can refer to during production.

I will not be posting the entire diary as most of this is hand written but some of the separate sketches/drawings I will scan in and show you :)

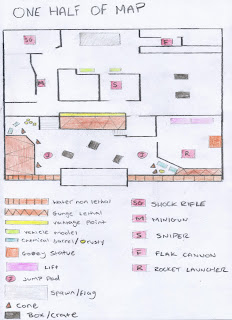
The first Picture is a birds eye view of one half of my map.  The entire map will be symmetrical which continues the theme of UT3 (Part of my criteria) plus this will halve build time which is always good.
It's only a first draft so may not be 100% accurate to what I finally make but 95% sure this will be the final result.

Map shows weapon placements, general structure of buildings and object positions.  The design was based on a map from another game that I liked the layout of and then modified to fit the criteria of an interview I had with a hardcore Unreal player which can be found in the diary.

One Half Of Map


I have also quickly added to the same picture showing directions a player can take showing 3 main routes a player can take

One Half Of Map (Directions of Play)


Here is the first draught of my Light placement on the map.  All though the map will be set at night time there still has to be many many lights.  In fact I am estimating the Light map you see below will end up having atleast twice as many lights at the end.

Light Map


The next Layout I made was to try and work out the scale of my map.  This proved very difficult as there are no real metric units in UT3 Editor just unreal units which don't really amount to anything.  

My aim was to get this as close as possible to help speed up the build process, but the first attempt was so far off the mark I entitled it 'Rubbish'

Size Map 'Rubbish'

The reason for this is that a medium size room in unreal is 1536 unit with and according to this map my entire playing area was only 960 units in width!!

So I decided to look at this from another angle.  Reference pictures are some of the most important and useful things to have so I created my own.  Going into the editor, I created 4 cube boxes with lighting, texture and a character for height reference.

256x256 Cube


512x512 Cube


1024x1024 Cube


2048x2048 Cube


All Cubes


These gave me great insight into what size rooms should be and so helped me create my second Size Map

Size Map 2


This was much better than the first but still had problems.  The width (From top to bottom in this view) is still wrong and I could start to see that without getting stuck in this was going to be difficult.  So I decided to start Blocking In my scene using standard BSP just to get an idea of scale and gameplay.  No texture would be added at this point or weapons etc... Just lighting and BSP

*A quick note*  
If your reading this and are 'hey, what the hell is BSP please explain' here goes...

In not too much detail, BSP "Binary Space Partitioning" is geometry in the level.  It can be very expensive to use (Memory etc.) but is very useful for Blocking In a scene and getting a general idea of what your map needs to look like.  For the actual final build of the map I would use static mesh's for almost everything and not BSP.  

BSP Standard


Beta01

Right here is a link to download my first beta for you to test.

http://qdrive.net/CrazyBertElite/file/190940/4bd09
54a1a1d7b11352b3849e628227a


Just unzip the file and copy CTF-SpacePort_Beta01.ut3
                                         CTF-SpacePort_Beta01_LOC_int.upk
                                         CTF-SpacePort_Beta01 (Type Configuration setting)
Copy these files into Documents > MyGames > Unreal Tournament 3 > UTGame > Published > CookedPC > Custom Maps

And then start the game.  It should be in the Capture The Flag menu at the bottom now so enjoy!! :)

Feedback will be great please... The UT3Readme.txt which came in the zipped file you downloaded gives you some details and what kind of feedback I need

Thanks to everyone who helps!

Some screen shots of Beta01

Click on all Images to maximise

Earth Shot


Flag Shot


Repair Shot


Tower Shot


Update

So it has been along time since I have actually updated this blog simply due to the fact that I have been so busy at uni.  Now though, it's almost xmas and I am free for a little while so I can catch up with personal projects

Beta 1 Feedback

So beta 1 went well but there were a number of suggestions which was fantastic.  Here is the feedback list:-

Good Things....

1.  Lifts.... "Insane" but in a good way "Do not change these, I love them."

**Due to the fact the lifts are really fast and would give you whip lash in real life!  But I found lifts to be really slow in the game and considering they are the only ways to get into the bases they needed to be fast.**

2.  Teleporter's....These were also liked as much as the lifts

So..  Really glad about the lifts and teleporter's being liked as these are the main points on the map to get to the flags.

Bad Points....

1.  Weapon placement...."Can't find weapons" - Although there are 4 weapons on each side of the map he had problems finding any???

2.  Hole...."I can get out of map" - Missing blocking volume near flags

3.  Lifts...."Stuck on lifts" - Due to one person at bottom and one at top where the triggers are

4.  Doors...."They go black when they open/close"  - Only have static lighting on mover's currently to help with FPS

5.  Layout..."Don't know where to go! I have found our flag but where is their's?"  - Answer - Turn round!!!!

6.  Tower room...."The boxes for robots don't have glass"  - Erm very picky will explain why when I talk about my optimisation techniques

7.  Terrain......"Terrain is pointy, you will lose marks." - A student trying to be a lecturer!!  - my explanation was simple...This is my first beta and is being tested for game play only not how the map currently looks...hence why basic lighting and no height fog etc

Beta02

So went through the feedback and added the following..

  • Missing Blocking Volume added near flag
  • Changed centre lifts to jump pad 
This is a major change to justify the fact that it is probably a bad idea to be dependent solely on the lifts
  • Dynamic Lights added to all movers to stop shading affects (Doors and lifts)
  • Base arrows added in more places to help with navigation.  Also added base symbols
  • Post process volumes inside bases, which I have changed the property values of the shading to tint a blue/red colour respectively.
  • Terrain smoothed out
  • Changed slime volume to have Bio weapon blob texture as I always wanted it to look like it was radioactive
  • Foliage Volume....added to Fire Hydrant with 2 Bio weapon static meshes to multiply around the hydrant giving a leek effect
  • Removed weapon locker which was for test purposes only and replaced with rocket

Beta02 Feedback

So once again this has been tested with all the new improvements and feedback was given

  • "Terrain still too pointy."
  • "Needs health in centre of map."
  • "All this open space and no guns!, just ammo and armour."
Beta03

Added the following

  • Smoothed out Terrain even more
  • Added Health in centre of map.  Positioned this above the slime as I felt it was not needed but as it was requested I obliged.  With this being above slime it gives the player a penalty if they miss the health they could land in the slime and further injure themselves.
Final Version

Well it came a time that this needed to be handed in so no more beta versions could be fully tested.

In the final handed in version I did however add a few more things for visual effect that would not effect game play

Height Fog
  • Sun Height fog (Tinted yellow)
  • A grey misty fog for sky and mountains
  • A lighter grey mist on floor
These gave the map more depth and more of a night/dusk look which is what I planned for

Problems to improve in the future

  • Bots seem to have problems with the Jump pad section (Getting up and down).  A simple fix to help bots getting down would be too add path nodes on each ledge
  • Lighting....Although in editor mode before cooking the lighting was exactly how I wanted it.  After cooking however, the lighting all seemed to darken.
  • Bio rifle texture/Static mesh.  I was rushed to cook the final version and hand in at the end and forgot to create and save this to my own package.  So when in editor mode when you try and close this it will ask you save this package.
Optimisation

  • Dynamic Lights.  Unamed_1 channel selected in light settings and movers so the dynamic light only affects these static mesh's and not everything within the light region
  • Textures.  Most of the textures on the map which took up the most space (memory) were selected and Light map resolution was overridden 32
  • Skydome.  Turned off blocking Volumes and Shading Properties
  • Static Mesh.  Selected all static mesh's that do not need dynamic light and switched off any properties that had to do with dynamic lighting...bacceptdynamiclights, bcastdynamicshadows etc
  • Earth and Moon.  Would only accept dynamic lighting so I added an extra directional light to the sky.  Changed it to a dynamic light and changed properties for light, earth and moon to also use the unamed_1 lighting channel.

Final Video
Wednesday 20 October 2010

Viking Boat Tutorial Week 4


Right well here is another simple low poly count model but this time is a bit more interesting.  Well if you like Viking Boats that is.

This time I added some lighting though and rendered with light tracing which seem to give it a bit more depth, and because of this I did 4 renders this time (Mainly because I like the model ;))

Some specs, which from now will be added out of my own interest
Polys  416
Tris     864
Edges  876
Verts   466

Tuesday 19 October 2010

Tutorials from 3ds Max Modeling for Games

Right so here I will be posting all my completed work from the great looking book by Andrew Gahan entitled, 3ds Max Modeling for Games.  This is part of my recommended reading by my Tutor and as I am trying to be a model student lately I will try and get this entire book finished!

Chapter 1
Low-poly Asset 1(30 minute tutorial) - Took a little longer as I was trying to juggle a book with one hand and my laptop with the other (Must buy some kind of book rest holder)

In this tutorial I was to create a box, apply texture maps, UVW map it and then do some simple renders.  *Excited* This is actually the first time I have got to do some texturing in 3ds Max, which I have been so eager to do.

So here is the first render (remember click to enlarge images)
and finally another render but showing the under side of the box

Chapter 2
Low-poly Asset 2 (1-hour tutorial) - I wish it had only taken this long

Well this tutorial was full of stuff to do from different types of boolean techniques to Target welding and using object properties to make things see-through and backface cull options.  The idea was to create a barrel with all of these tools.

All in all not too bad, was quite difficult compared to the box but I got through it.  It is not 100% perfect and in fact it's far from it but I decided that at my current stage of modelling I should not b too worried and just get on with it.

Again 2 rendered pictures, the first showing the top and front and the second showing the bottom

Top

Bottom


Monday 18 October 2010

Motion Capture

Prep Video 1

Right here is the first kinda prep video for our Motion capture project. This is group work, me being the performer on a really bad hair day in my bike trouser's. Still it gave us a good idea to what we wanted to do.


My attempt at storyboard

Here is a storyboard I drew as well no times added to it yet as this is just a draft for now.  Picture quality is not great but I will digitalise this eventually and update.


Prep Video 2

Another Video we took after refining some details/errors


Final Story board

Final Story boards re-drawn by another member of the group


Then edited by me in Photoshop and words/times added

First Model for our scene


Below is a simple Model of a tree I created to export from 3ds Max and into Motion Builder!  Not sure exactly how to do this at this point but will be researching into this shortly

Model was created using a basic cylinder for the main part of the tree and then to make the branches I simply created a line (wavy).  Once I was happy with the line I selected a polygon from the main part of the tree and selected extrude along line from the options menu.  At this point I cannot be too sure about scale though as I have no idea the size of the surfer dude will be in motion builder, but from what I have seen I should be able to fix this very quickly.


Second Model for our Scene

Next I created a Axe in 3ds Max using cylinders and squares.  These were converted to editable poly's and using a reference image from google images I produced the following


Again as you can see a very simple model as I did not want anything too complicated for the scene as this would be the first time myself and the group were to do motion capture and did not want to complicate things

Final Preparation for Motion Capture

Before the capture we needed to finalise the Moves and Shot list.  These would assist us on the day of capture with what we wanted to achieve.

Move/Motion List

Questions Of Motion List

These were a basic quick check to make sure the Motion List was correct


Shot List

As you can the shot list is very important.  It contains the file names which the software technician would need to name all files correctly during the capture.  Also information for the director and choreographer to make sure the performer is performing the moves to the times on the shot list and the correct moves are performed.

Capture Day

So now is the day of capture.  The group is fully prepared and we have 4 hours of capture time in the capture studio using the Vicon system

Capture Video's

Some video's for my future reference and your amusement ;)

Some Practice


Skipping


Stretching


Chopping 1


Chopping 2


Axe Stuck with Foot Pull 1


Axe with Foot Pull 2


Motion Builder

Our next task was to each take a scene that we captured, and using Motion Builder we were to clean up the data.  Cleaning the data meant sorting out any occlusion problems we had and any data that moved away from the motion data points.


What the Optical Data Looks Like


3DS Max Models

So After lot's of research I found that the easiest way to get my Tree and Axe model into our capture scene was to use the FBX plugin from Autodesk.  This made it really simple as I only needed to click a few options and the models were converted to a FBX format and ready to import into Motion builder

Data

So once each member had cleaned up the scenes and had baked the optical data to the surfer characters rig it was time for me to put all the data together in one flowing scene.

This was simply done in Motion Builder using the story mode.  Dragging and dropping each scene into the time-line and then matching up a certain point from beginning to end of each scene.  Then using options such as frame start/end and ghosting to check the scenes matched properly.

Camera/Rendering

The scene once all put together was then handed over by me to the director who added camera's and rendered the scene

Sound

The scene was then passed to the sound editor who added the sounds to the scene


More Documentation

Here is some more documentation that was required


Final Video

There is some more bits and bobs to be added yet but until I can find these from other group members I will finish up here and add the final video for you guys/gals to see.....enjoy


Sunday 17 October 2010

3D Skip Tutorial Week 3


As you can see a basic skip created here.  Not much to tell really, just used a box and then used tools like bevel, extrude, inset.  Then sliced and diced the box into a quarter of what you see now (Should have taken a screen print of this).  Once happy with angles etc I added 2 set's of symmetry to create a full skip.  For future when I have time I will try and add texture etc to it but as we have not yet covered this and won't till about week 6 it will have to do for now.

Saturday 16 October 2010

Glock Practice


Something have yet to finish.  Just a quick practice really before I start my assignment which is to create a real life weapon using blue prints found on the web.  Started this just to quickly assess what difficulties I may come across and practice some techniques I have yet not met in the tutorials at uni.  Will finish and update this eventually.

3D Pencil Tutorial Week 2


Using Keyboard Entry to Create a pencil using standard primitives and Boolean operations. Again rendered normally and with forced Wire-frame. 

Friday 15 October 2010

3D Chair Tutorial Week 2


The tubular frames of the chairs you see above were created by drawing one half the shape, then mirroring a copy of the shape, attaching the two shapes together, deleting redundant vertices then lofting a circle shape on to the path and optimising the resulting Lofted object.

It is impossible to draw a line based object in three dimensions using a mouse. The only option is to use keyboard entry. This exercise was designed to further my understanding of spatial awareness, coordinate systems and precision modelling.  Finally a rendered image and the latter image rendered with forced wire-frame.

Dining Room Tutorial Week 1


Slightly more advanced for week 1.  The Tutorial was to get used to using basic primitive shapes in 3ds Max. Still no rendering done and again only adding a standard material to help with the visual effect.